I won't be doing much sewing and crafting for the next month or so, as DH and I will be moving!
I'll be spending my time sorting through closets, cupboards and drawers and packing up moving boxes. We have lived in this house for ten years, so I've got my work cut out for me.
My blog postings will be few and far between, but I'll try to stop by your blogs when I can and say hello.

Tuesday, March 29, 2011
Saturday, March 26, 2011
And The Winners Are ....
Funny story about those patterns... I e-mailed Izzy & Ivy to thank them for sending me sooo many patterns and it turns out that their shipping clerk made a mistake in sending me so many... she was only supposed to send me one each of the five patterns... oops!
I'm more than happy to share them, though, so the lucky winners are ....
all of you! That's right, I decided that since three of you wanted them - Karin, Andrea and Kara - all of you are going to get the patterns! Yay!!
Ladies, please send me an e-mail (azbelle3@yahoo.com) with your mailing info so that I can get them mailed out to you. Congratulations and happy sewing!
Tuesday, March 22, 2011
One Good Turn Deserves Another... and Now Another (AKA The Giveaway!)
Last month I participated in the Basics Charity Challenge and donated items to my local Ronald McDonald House. I really enjoyed participating and have made it a goal to continue to donate to local charities.
Well, imagine my surprise when I got an e-mail from Cara at Cara Quilts telling me I had won a prize in her drawing from all of those who participated! She told me I had won some patterns from Izzy & Ivy Designs.
Imagine my surprise again when I received my package from Izzy & Ivy yesterday and it contained not one, not two, but FIVE copies each of FIVE different patterns!! That's right, they sent me 25 patterns in all!!!
Since one good turn deserves another... and now another.... I have decided that TWO of my lucky followers will each win a set of the five patterns. Here they all are:

There's a messenger bag that I can't wait to make for myself:

The cutest hat called "Jack and Jill" that you can make for a boy or girl.
 An adorable top called Beverly Belle ... wish they had it in my size... LOL! Looks like it has plenty of "twirl factor!"
 For sleepovers at Grandma's house, there is the Gabby's Sleepover Jammies pattern. They can be made out of cotton or flannel, and if you put leggings under it they could wear it as a dress... adorable!
 And last, but certainly not least, there is the Claire Marie Topcoat. You could use different fabric options to make a warm winter coat or a darling spring jacket.

The hat size chart shows sizes Newborn to Adult; the twirly top, jammies and coat all show a size chart from 2T to 14! I snuck a peek at the patterns and they look great ... plenty of instructions and diagrams so that even a newbie sewist like me could make them.
So how do you win you ask? It's simple... just be a follower of my blog and leave me a comment on this post telling me you want them. Easy peasy!
The deadline to enter is by midnight this Friday, March 25, 2011. I will draw the 2 lucky winners on Saturday using a random number generator. Please be sure and leave your e-mail address so that I can contact you if you are one of the winners.
Good luck everyone!
Well, imagine my surprise when I got an e-mail from Cara at Cara Quilts telling me I had won a prize in her drawing from all of those who participated! She told me I had won some patterns from Izzy & Ivy Designs.
Imagine my surprise again when I received my package from Izzy & Ivy yesterday and it contained not one, not two, but FIVE copies each of FIVE different patterns!! That's right, they sent me 25 patterns in all!!!
Since one good turn deserves another... and now another.... I have decided that TWO of my lucky followers will each win a set of the five patterns. Here they all are:

There's a messenger bag that I can't wait to make for myself:


The hat size chart shows sizes Newborn to Adult; the twirly top, jammies and coat all show a size chart from 2T to 14! I snuck a peek at the patterns and they look great ... plenty of instructions and diagrams so that even a newbie sewist like me could make them.
So how do you win you ask? It's simple... just be a follower of my blog and leave me a comment on this post telling me you want them. Easy peasy!
The deadline to enter is by midnight this Friday, March 25, 2011. I will draw the 2 lucky winners on Saturday using a random number generator. Please be sure and leave your e-mail address so that I can contact you if you are one of the winners.
Good luck everyone!
Sunday, March 20, 2011
A Sewing Tip
It is not often that I come up with an original idea when it comes to sewing. However, one day while I was sewing the projects with my SIL Beth I had an epiphany, so I thought I would share it with you.
I love using my rotary cutter, mat and rulers - they make cutting fabric so much easier. But sometimes when I am cutting a longer piece of fabric and using my 6 X 24 inch ruler, I would find that the ruler would sometimes wiggle on me at the very top. The thought struck me - why not anchor the ruler with something heavy to make the ruler stay in place?
I went to the pantry and grabbed a bag of lentil beans and voila - no more wobbly ruler!! I decided to take it one step further and I made a cover for my bag 'o beans!
Since I actually needed those lentils for a recipe, I scrounged through the pantry and found a half-open bag of kidney beans, as well as a half-open bag of popcorn.

Since the bag of lentils worked pretty good, I decided to make my bag about that size. I found some home-dec weight fabric in my bag of scraps and set to work. I just cut the fabric to size, put it wrong sides together, sewed around the edges, and left a small opening for turning. Once I turned it inside out, I filled it up with the kidney beans and popcorn. My dear SIL Becky hand-stitched the small opening closed for me (because she knows how much I hate hand-stitching!)
 Now I have a nice weight that I can use to hold my ruler in place while cutting.

I love using my rotary cutter, mat and rulers - they make cutting fabric so much easier. But sometimes when I am cutting a longer piece of fabric and using my 6 X 24 inch ruler, I would find that the ruler would sometimes wiggle on me at the very top. The thought struck me - why not anchor the ruler with something heavy to make the ruler stay in place?
I went to the pantry and grabbed a bag of lentil beans and voila - no more wobbly ruler!! I decided to take it one step further and I made a cover for my bag 'o beans!
Since I actually needed those lentils for a recipe, I scrounged through the pantry and found a half-open bag of kidney beans, as well as a half-open bag of popcorn.

Since the bag of lentils worked pretty good, I decided to make my bag about that size. I found some home-dec weight fabric in my bag of scraps and set to work. I just cut the fabric to size, put it wrong sides together, sewed around the edges, and left a small opening for turning. Once I turned it inside out, I filled it up with the kidney beans and popcorn. My dear SIL Becky hand-stitched the small opening closed for me (because she knows how much I hate hand-stitching!)


Friday, March 18, 2011
Project Number Four - Fat Quarter Bags
The fourth and final project Beth and I made together was a Fat Quarter Bag using this pattern:
 It is Pattern #1144 Six Pack Stack Reversible Fat Quarter Tote by Whistlepig Creek Productions. I either bought this pattern at a quilt show or at Jo-Anns, I don't remember which. If you are interested in it, it is probably available on-line also.
We liked it so much we ended up making 4 of them! Here is the first one I made, which I gifted to my other SIL Becky:
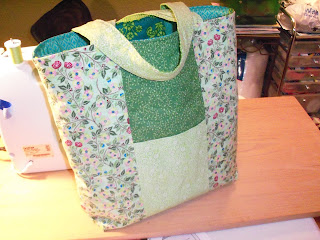 It has four pockets total; 2 on the outside and 2 on the inside.

I then made one for myself in pinks and purples. Here is one side of it:

 I added a magnetic snap to mine, since I wanted to use it as an everyday purse. I now love magnetic snaps!! They are so easy to put in and work great. We just reinforced the area where we put them in with some small pieces of leftover fusible fleece. I'll give you a tip too; I found several different kinds at Jo-Anns, but they were cheaper in the purse handle section than they were in the notions area!
Beth ended up liking the pattern so much she made 2 bags for herself:


I really liked this pattern. It was perfect for a newbie sewer like me, with detailed instructions and diagrams to help me through each step in the process. Be aware that you will pretty much use every inch of your fat quarters, so make sure your fat quarters are truly 18 X 21. We had to make our handles a little shorter than we wanted on a couple of these because the fabric was not cut true to size.
As usual, Beth and I ended up using some of the decorative stitches on these too!


I had so much fun sewing with my sister-in-law that I have asked her to come back this summer for another visit! The next time we will tackle quilting, which I am so anxious to learn. I think we've even convinced our other SIL Becky to buy a new sewing machine and join us! It's going to be so much fun... I can't wait!

We liked it so much we ended up making 4 of them! Here is the first one I made, which I gifted to my other SIL Becky:


I then made one for myself in pinks and purples. Here is one side of it:

And here is the other side:

Beth ended up liking the pattern so much she made 2 bags for herself:

Here is the interior of the one on the right:

As usual, Beth and I ended up using some of the decorative stitches on these too!


I had so much fun sewing with my sister-in-law that I have asked her to come back this summer for another visit! The next time we will tackle quilting, which I am so anxious to learn. I think we've even convinced our other SIL Becky to buy a new sewing machine and join us! It's going to be so much fun... I can't wait!
Thursday, March 17, 2011
Project Number Three - Dresses
Remember the semi-fail dress I made awhile back? Beth helped me do the second one, and it turns out I probably didn't do as bad as I thought I did! I just didn't realize that I should have taken out the stitches I had done to gather the fabric (duh!!). Here is the second one:


I think it turned out so cute... I love the little bow we added at the bottom. I purchased this fabric at Hobby Lobby.. I was very impressed with the quality of their fabric, as well as the low prices. I so wish they would put a store in my town!!
 There are all kinds of pillowcase dress patterns out there. I used the one found here. I made my own bias tape and I made the ties out of leftover fabric rather than using ribbon. Here is the second one we made:
 I used some of the special stitches on my machine again and some more variegated thread to add a little extra to the cuff:

 I will box them up and mail them off this week; I can't wait to see if she likes them.
After making the pillowcase dresses, I saw the Dress a Girl Around the World Sew Along here. I will be making a few more and sending them along. If you have some time and a little extra fabric, please consider helping out this cause or the Little Dresses for Africa organization!

Beth taught me a neat new trick too. You know how the traditional way of gathering is to sew two lines of stitches side by side and then pull the threads? Well, Beth had me sew three lines of stitching instead of two; it was much easier to work with. You should try it next time you have to do gathering stitches.
Then we moved on to making pillowcase dresses. I have seen these all over blogland and had been wanting to make one for the longest time. This was a great project, because I learned how to make my own bias tape. Yes, I actually made my own bias tape, can you believe it?? It is really not that hard and I think it was much easier to work with than the store-bought kind. If you'd like to learn how to make it, let me know, maybe I could do a tutorial.
Here is the first dress we made:

I think it turned out so cute... I love the little bow we added at the bottom. I purchased this fabric at Hobby Lobby.. I was very impressed with the quality of their fabric, as well as the low prices. I so wish they would put a store in my town!!


So here are all 4 dresses that I ended up making for Teagan:

After making the pillowcase dresses, I saw the Dress a Girl Around the World Sew Along here. I will be making a few more and sending them along. If you have some time and a little extra fabric, please consider helping out this cause or the Little Dresses for Africa organization!
Tuesday, March 15, 2011
Project Number Two - Mesh Tote Bag

Here is the second project I made with Beth - plastic mesh tote bags. I had never worked with the plastic mesh before, but it was surprisingly easy to sew on. I just put a heavy duty needle in the machine and was good to go.
This was another project that I had purchased in a kit and could not understand the directions. Will I never learn not to buy these pre-packaged kits??? LOL

Fortunately for me, Beth had used this exact same pattern before, so she knew how to make them. The yellow bag turned out just a bit smaller than it should have been due to a cutting mistake on my part. If you click on the photos for a closer look, you can see that we played around with the stitching on these too.

If you would be interested in the pattern, let me know. I'd be more than happy to share it with you. If you are in the Tucson area, I have seen this plastic mesh for sale at The Quilt Basket on Tanque Verde Road. Otherwise, I'm sure it is available for purchase on line.
Can't wait till tomorrow to show you our third project - little girl dresses!
Monday, March 14, 2011
Project Number One - Table Runner
Good morning! I am finally back with some of my projects I did with my sister-in-law Beth. She is absolutely amazing, and I learned soooooooooo much from her. I am now sewing with much more confidence and, if I do say so myself, turning out much nicer looking projects!
I will do several posts this week to show you all the neat projects we did. First up is the table runner. I purchased it as a kit at a quilt show a few months ago, and it was one of those patterns that I really couldn't understand very well. Beth helped me through it and here is the result:

I used some of the neat decorative stitches on my sewing machine, along with some multi-colored thread, and added some cute detail to it:
 After completing it, I liked it so much I decided to make a second one for my Mom.
 Again we added some cute detailing stitches:


You can tell from the photos that I didn't put that on mine, as my kittens would have it destroyed in no time... LOL!
Tomorrow's installment will be some tote bags we made with some plastic mesh and fabric. Hope to see you then!
I will do several posts this week to show you all the neat projects we did. First up is the table runner. I purchased it as a kit at a quilt show a few months ago, and it was one of those patterns that I really couldn't understand very well. Beth helped me through it and here is the result:

I used some of the neat decorative stitches on my sewing machine, along with some multi-colored thread, and added some cute detail to it:


And to pretty it up even more, Beth added a ribbon tassel at either end:

Tomorrow's installment will be some tote bags we made with some plastic mesh and fabric. Hope to see you then!
Tuesday, March 1, 2011
I'm So Excited

She is going to help me with some sewing projects that need finished (and some I haven't even started yet). I am hoping we have have time for her to get me started quilting something too.
Yay.... I can't wait! I promise I'll post pics later of the finished projects.
Have a good week everyone! :)
Subscribe to:
Posts
(
Atom
)